

Monday, July 12, 2010
Sunday, February 21, 2010
How to turn a Lunch Sack into a Gift Sack
 This is a fun little project that will transform an ordinary brown lunch sack into a cute gift sack. All you need is a lunch sack, 1 piece of your favorite 12x12 scrapbooking paper, scissors, tacky glue, gluestick or adhesive tape, single hole punch, ribbon and other embelishments.
1. Cut about 3 inches off the top of the sack. 2. Fold the flap on the bottom of the sack down so you have a flat surface. 3. Cut the scapbooking paper to fit each side of the lunch sack. On one side cut the paper about 2 inches longer shown in the bottom right side photo.
 4. Glue, or use adhesive tape and secure the paper to each side.
 5. On the longer side fold the paper over the sack.
 6. With scissors or paper edgers cut along the end of the flap leaving a little over an inch or more which ever you desire or looks best..
 7. Using your embelishments decorate or design the front of the sack for any occasion.
 10. Thread the ribbon through each hole so the tie is at the front. Attach your gift tag and tie a bow to close.
 Fill with goodies, candy, jewelry or soap and lotions.
 4. Glue, or use adhesive tape and secure the paper to each side.
 5. On the longer side fold the paper over the sack.
 6. With scissors or paper edgers cut along the end of the flap leaving a little over an inch or more which ever you desire or looks best..
 7. Using your embelishments decorate or design the front of the sack for any occasion.
8. Fold the flap over the top and punch two holes going all the way through .
9. Optional: with extra scrapbook paper make a card or gift tag.
 10. Thread the ribbon through each hole so the tie is at the front. Attach your gift tag and tie a bow to close.
 Fill with goodies, candy, jewelry or soap and lotions.
 Have fun with your project!!
Tuesday, January 26, 2010
How To Make A Lunch Sack Photo Album

Step 1. Start out by takeing 3 paper sacks and lay them out flat. Top and bottom sacks with the bottom of the sack on the left and face up and the middle sack with bottom face down and to the right. Step 2. fold each sack in half and stack inside of each other.
Step 3. Punch 3 holes in the fold going down the side.
Step 4. Tie ribbon or string in a knot or bow to hold the sacks together.
Step 5. Choose your paper, stickers, embellishments and create.
 Fun Tip Ideas:
 Choose a theme!! Example: Valentines, Wedding, baby or families.
Use smaller photos or cut down to size.
Distress your photos (see last post) and lunch sacks to give it that rustic look.
Lunch sack openings are use as a pocket for a slider (see top photo bottom half). Enjoy!!
Saturday, January 23, 2010
Distrssing Your Photos
 I love distressing my photos on any scrap booking project or other pictures I frame. The frame I used on this project has a flat section in the middle (no glass) and a raised metal edge. Their was already a picture on the frame so I just mod podged over it. This frame was also a great find at Ross for $10.00.
See below for distressing
your photos.
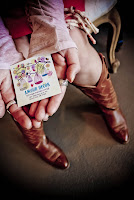
 The photo on the left is the original. I used photo shop to crop and removed the color and added a little red and yellow into the black and white tones. I then printed the photo right onto regular white card stock to give it that old time finish.
 Steps left to right: I used "Vintage Photo" Distress Ink and took a piece of material (anything soft works, like gauze, sponge or a sock) and dabbed a little in the ink pad and then rubbed it along the edges of the photo. Then I held the photo flat and rubbed the ink pad along the edge to darken the edges a little. Using Mod Podge (Matte finish) I took a sponge brush and brushed the flat, middle part of the frame, lay ed the photo down over top the mod podge and pressed down along the edges to push out all the bubbles. To secure the photo I covered the whole photo in mod podge.
Wednesday, January 20, 2010
Tablecloth Curtins

 Very easy curtins made from a tablecloth. I found a 64x80 red table cloth at Target for $14.99. I'll I wanted was to accent red around my windows and have the curtins for look. I cut up the middle of the table cloth the long width. Hemed the long side and then at the top where my curtin rod would go I folded over about 2 inches. I sewed the hem down and then sewed along the fold leaving an inch at the top to add a little ruffle to the curtin.


Recovering My Dinning Room Chairs
For a more durable fabric I used a tablecloth. I also noticed the price of a table cloth is less expensive then fabric by the yard.
Remove the seat from the chair and lay it on top of the fabric. Cut around the seat leaving 2 to 2 and a half inches all the way around the seat. Then pulling tightly, fold the fabric in twice up over the back of the seat and use a staple gun to sucure the fabric. On the corners fold in each side then pull up the middle and staple.

Subscribe to:
Posts (Atom)


